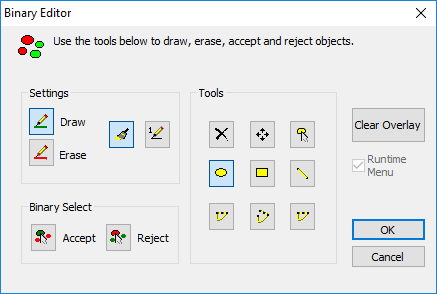
The Binary Editor can be used to create and modify a binary image. The Editor is very useful when there is a need to manually edit objects in the image. The Binary Editor is a great tool that provides precision, accuracy and a variety of tools for editing objects. The Editor has two modes of operation for editing objects and simplified controls for an easy-to-use interface. The Binary Editor is accessed by clicking the Draw/Erase button in the Analysis pane.

The Binary Editor provides two ways for users to edit the binary images layer. The first mode utilizes the Settings and Tools toolbars and allows users to edit objects by using the Shape Tools to connect or separate objects. The second mode uses the Binary Select toolbar and lets the user Accept![]() (Binary Editor) Accept - the first click on an object after activating the Accept mode will deselect all objects except the clicked object. or Reject
(Binary Editor) Accept - the first click on an object after activating the Accept mode will deselect all objects except the clicked object. or Reject![]() (Binary Editor) Reject - the first click on an object after activating the Reject mode will select all objects except the clicked object. individual objects manually with a single mouse click.
(Binary Editor) Reject - the first click on an object after activating the Reject mode will select all objects except the clicked object. individual objects manually with a single mouse click.
Hint: The image display magnification can be increased for detailed examination and fine changes. This option can be selected in between other modifications.
Simply select "Draw"
or "Erase" and use the shapes toolbar to edit individual object's
by drawing or erasing pixels in the binary layer within or between the
objects. If the line too thick, easy change the line thickness using the Line Thickness icon. The shapes toolbar provides a variety of tools to connect or separate objects. ![]() Click hereto see an example.
Click hereto see an example.
Choose either "Accept" or "Reject" and then use the mouse to select individual objects to be accepted (green or silver) or rejected (red). Subsequent clicks will toggle each clicked object's acceptance status between accepted and rejected. When in the Binary Select mode it is not possible to use the shapes toolbar items until the mode is exited. To exit the Binary Select mode, simply click or toggle off the active accept or reject button.
Note: When the Binary Select mode is active and the Accept button is active, all of the previously selected objects are displayed in red and may now be accepted. This also true when the Reject button is active. All of the previously selected objects are green or silver and may now be rejected.
Hint: Use Qualify to remove unwanted objects based on measurements like size, shape and position. The image display magnification can be increased for detailed examination and fine changes. This option can be selected in between other modifications.
The table below identifies of buttons in the Binary Editor by name and function.
| Icon | Name | Function |
|---|---|---|
_32x33.png)
|
Draw |

|

|
Erase |

|

|
Outline or Filled |

|

|
Line Thickness |

|

|
Copy Selected Shape(s) |

|

|
Paste Shape(s) | See above |

|
Move Shape |

|

|
Clone Shape(s) |

|

|
Ellipse Shape (Circle) |

|

|
Rectangle Shape |

|

|
Straight Line Shape |

|

|
Closed Polygon Shape |

|

|
Open Polygon Shape |

|

|
Move Shape |

|

|
Accept Objects Icon |

|

|
Rejects Objects Icon |
|

|
Clear Shapes |

|